distanced learning

More Jamboard in the Music Classroom (Testing The New Integration with Google Meet)

Google Meet rolling out Jamboard integration for collaborative whiteboarding | 9to5Google:

Last week, Googleโ€™s video conferencing tool launched a 49-person grid and background blur. Google Meet is now integrating with Jamboard to add a digital whiteboard for visual and collaborative brainstorming.

Google Jamboard, which I have blogged about here, is indeed a fun tool and all of my students find it engaging. 

This new Google Meet integration is awesome. Once you start up a digital whiteboard from within a Meet, Jamboard asks you if you want to create a new one or use an existing file in your Google Drive. If you opt to create a new one, it automatically saves it to your drive and names it using the date and meet code of your session.

Immediately, a dialogue with share permissions for the file pops up, pre-filled with the accounts of all students who are present in the Meet so that you can make sure they all have access in one click.

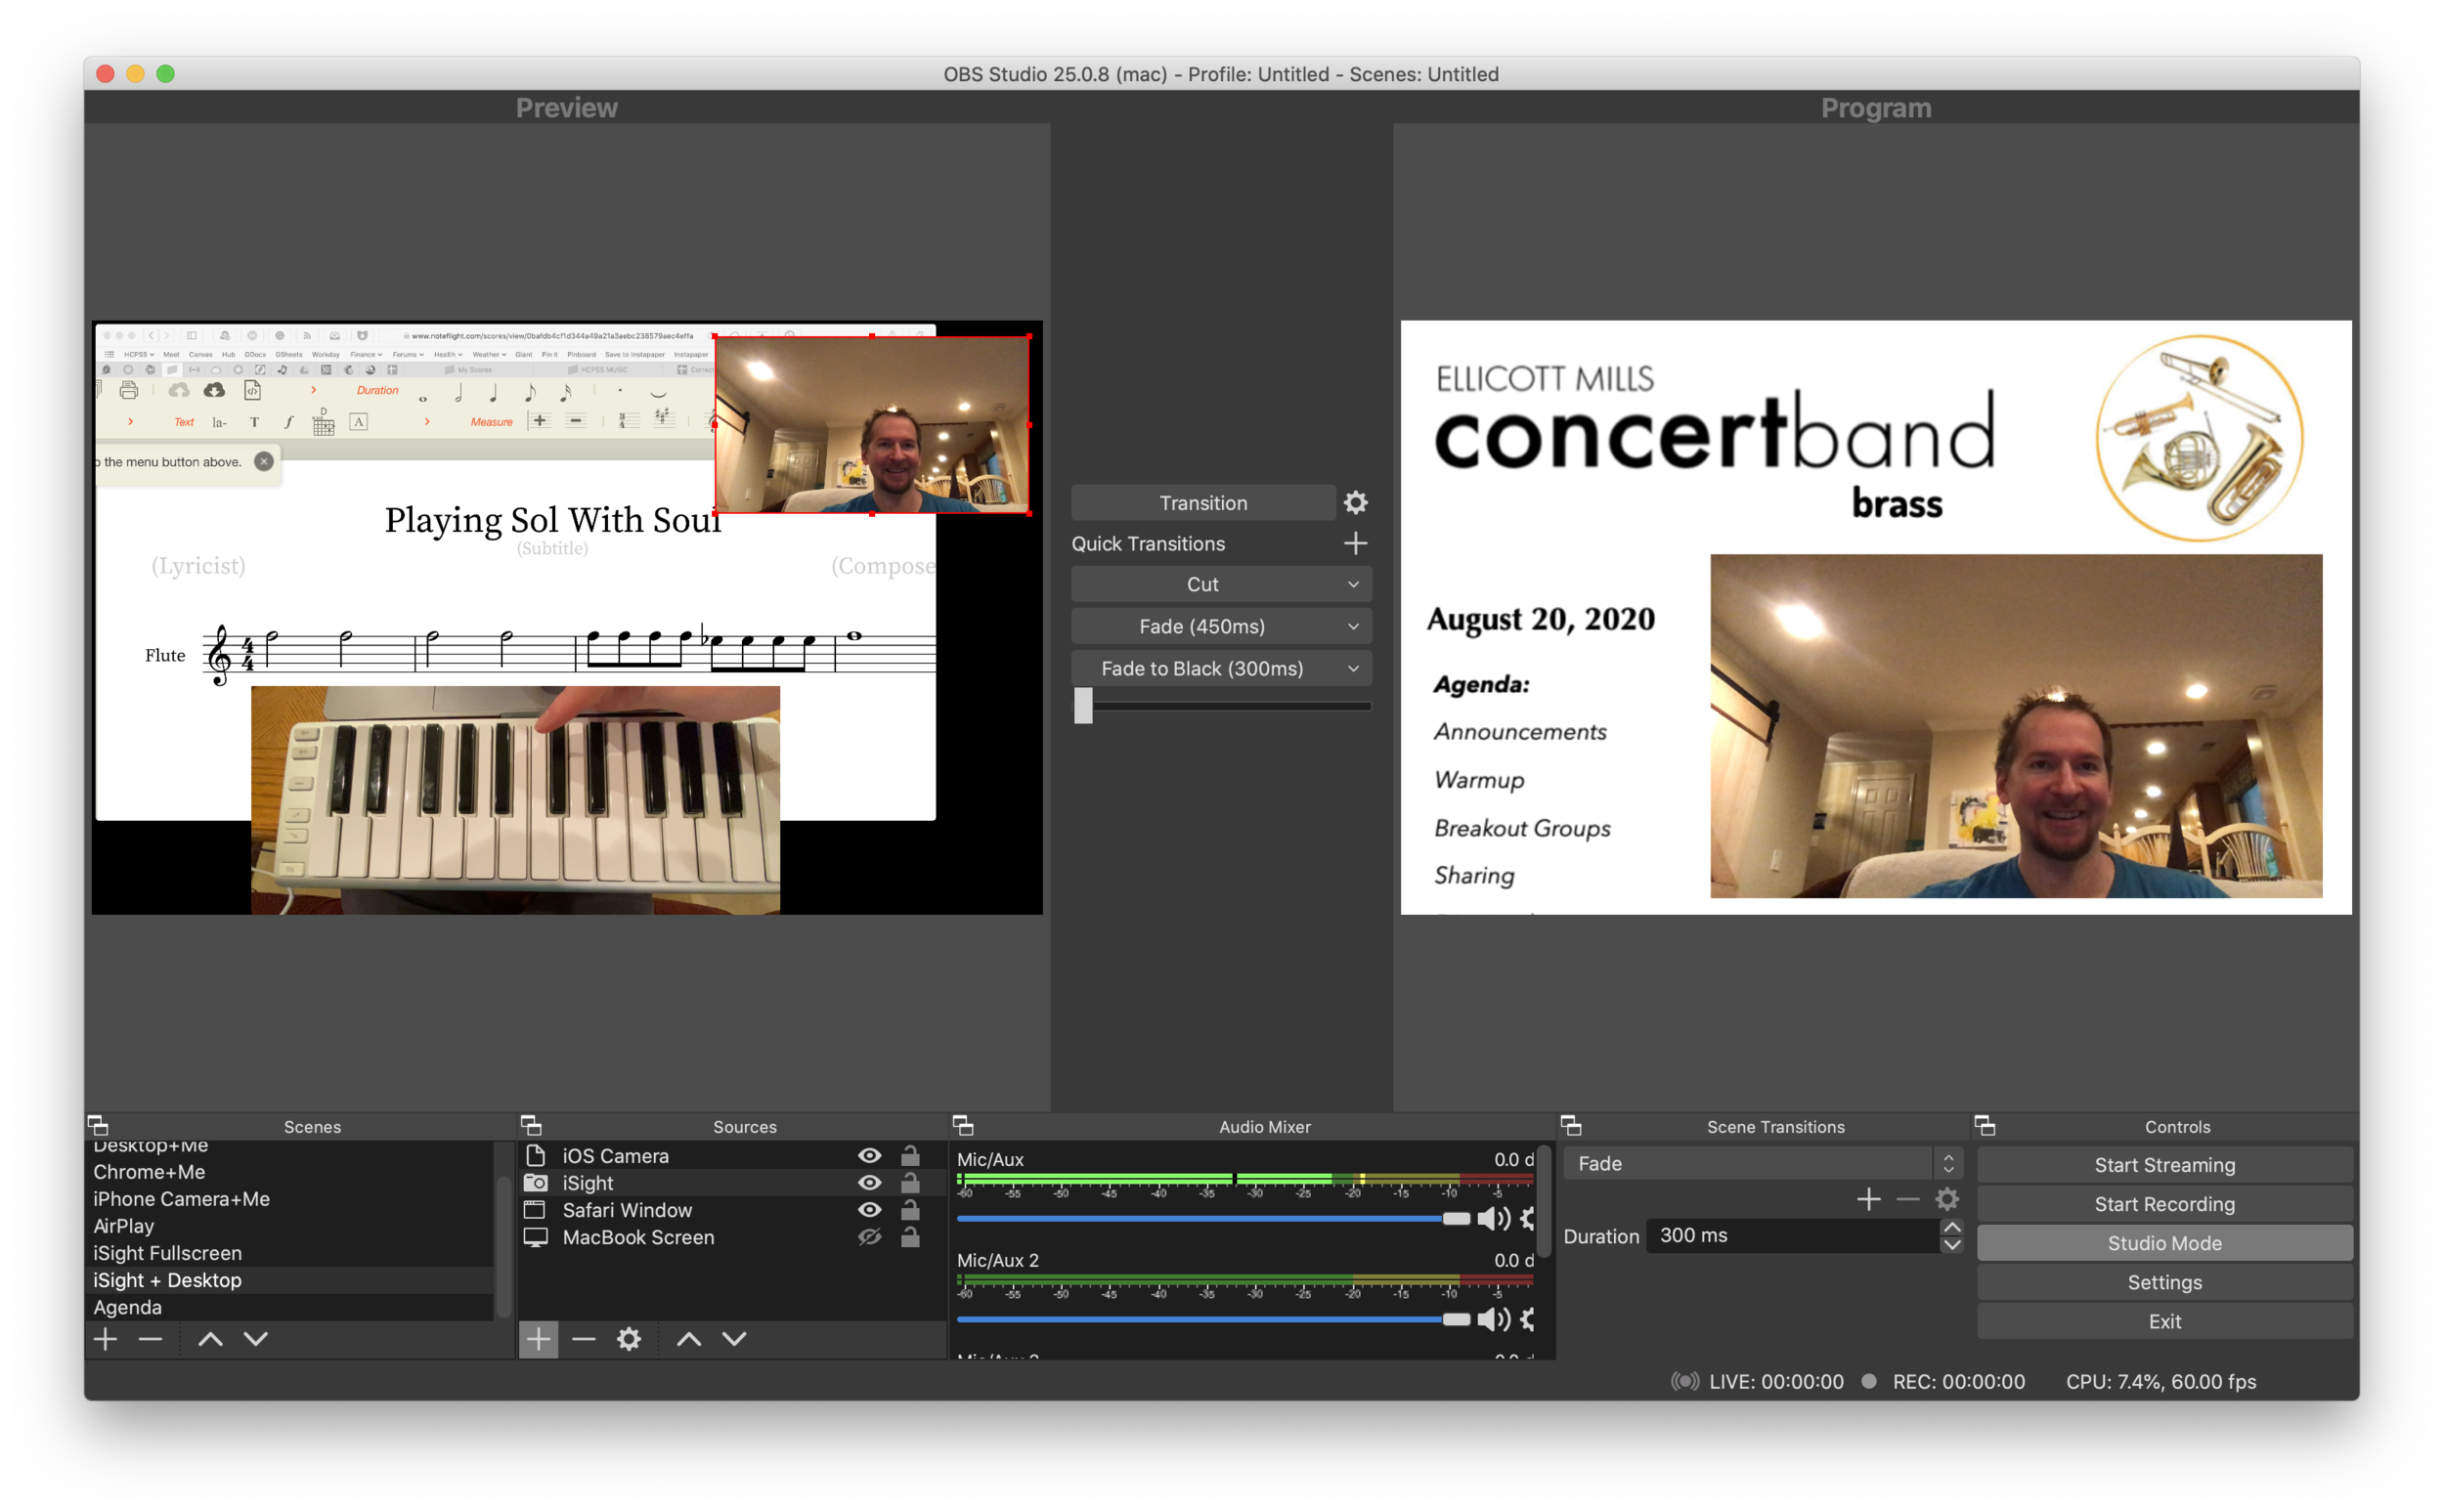
The integration is very smooth. I tested it today at the beginning of my classes so that they could give feedback to one another on a recent Soundtrap project I had them do.

The students recorded brass duets and trios in Soundtrap projects last week. I played three examples of them for the class today and students posted sticky notes on this whiteboard that took me one minute to set up last night. It was a simple activity that was made even more simple by this new integration.

CleanShot 2020-10-05 at 10.23.31.png

Attendance for Google Meet | A Chrome Extension That Automatically Takes Your Attendance for You and Saves It to a Google Sheet

Attendance for Google Meet (download here) is an exceptional extension for Google Chrome that automatically takes attendance for you and saves it to a Google Sheet document in your Google Drive.

There are other extensions like this but most of them are poorly designed, buggy, and unreliable. 

Attendance for Google Meet has an elegant and straightforward design and user experience, down to the icon even matching Google's 'Material Design' language. I am especially proud of this extension because it is made by a student at Centennial High School, which is one of the schools that my band program sends students to when they graduate.

Watch the video below to get an idea of what the features look like in action.

The process is simple. Once installed, you are prompted to create a class list the next time you start a Google Meet. Creating a list is as simple as entering the students names and pressing enter after each one. Once a class is created, you can select it from the same menu every time you launch a Meet. 

The app logs when kids enter, when they leave, and the total number of minutes they spent in class, so you can catch it if they dip in for the first minute and then leave immediately. Even the Google Sheet is designed to be easy to read.

There are some bugs, notably that the chat window closes frequently during the session. I also have to manually export the list before closing the Meet because the option you check in settings to make this happen automatically keeps turning itself off.

I strongly recommend this extension if you are teaching with Google Meet this year. Congratulations to this awesome student developer on making such a useful tool for teachers!

๐Ÿ”— Book: Teaching Effectively with Zoom | by Dan Levy

Dan Levy has a book out called Teaching Effectively with Zoom.

Zoom is not my dominant teaching platform of choice, but this book looks really interesting, and likely has application for all video teaching. Click the link below for more information.

Home | Teaching Effectively with Zoom:

In this website, you will be able to: Find resources related to the book. Read short stories about how educators are using Zoom in interesting or innovative ways Submit your own stories to share with others about how you have been using Zoom to engage your students and help them learn

๐Ÿ”— Google Meet now works with Chromecast on your TV

Google Meet now works with Chromecast on your TV. - 9to5Google:

Meet on Chromecast works exclusively through the Chrome browser on your desktop or laptop computer. Thatโ€™s because, when this is running, Google still uses the camera, microphone, and audio from your machine to power the experience. The meeting itself is just cast off to your TV or other display so you can view it on a larger display. Google is continuing to be quite aggressive with updates to Google Meet.

While I am happy with my tech setup in my studio, I know there will be times when I need a change of scenery. I fully plan to teach some lessons from my sunroom and living room. My living room TV has a Chromecast built in and I can totally see myself projecting the class on to the big screen while providing feedback from my laptop on the couch and using the laptop screen as extra real estate for other apps.

๐ŸŽ™ METT Episode #15 - Double the Burns, Double the Fun!... with Amy Burns

Elementary music educator, Amy Burns, joins the show! We talk about Seesaw, using tech in the elementary general music classroom, and her new book: Using Technology with Elementary Music Approaches!!!

Show Notes:

Stuff Amy is doing:

App of the Week:
Robby - SoundSource by Rogue Amoeba
Amy - Tripple Feature! - Timestamp Camera | MixCam app | Focos

Album of the Week:
Robby - Clear Line | Jacob Garchik
Amy - In the Heights | Lin-Manuel Miranda

Where to Find Us:
Robby - Twitter | Blog | Book
Amy - Twitter | Website

Please don't forget to rate the show and share it with others!

Subscribe to Music Ed Tech Talk:

Subscribe to the Blog

Subscribe to the Podcast in...
Apple Podcasts | Overcast | Castro | Spotify | RSS

Hyper-charging Online Classes with Open Broadcaster Software

OBS allows me to combine multiple sources into engaging scenes that I can easily transition between. The right video represents the scene that is live for my students to see in Google Meet. The left represents the scene I have queued up to go live wโ€ฆ

OBS allows me to combine multiple sources into engaging scenes that I can easily transition between. The right video represents the scene that is live for my students to see in Google Meet. The left represents the scene I have queued up to go live when I press a transition button.

In an effort to embellish my online teaching setup, I have been experimenting with Open Broadcaster Software. It's free on Windows and Mac and honestly not that hard to set up. 

It links seamlessly to most streaming services and by installing this plugin, you can have the output of your broadcast be the input of your Google Meet, Zoom, or Microsoft Teams classroom. This pairs really well with my Loopback workflow, which has now become the basis for all audio input in my online classes.

The sources that can make up your scenes.

The sources that can make up your scenes.

OBS allows you to create scenes that combine different video sources, graphics, backgrounds, and microphones, and rapidly switch between them. You could have a scene that is just your web cam's view of your face talking or another one that combines a window of your web browser with your webcam's view of your face in the lower right corner. You could even have an image from your hard drive as a graphic in the upper corner of a scene, or as a static image or background. 

The video on the right represents the live broadcast, whether that be a Twitch Stream, Facebook Live, or your end of a video call. 

The video on the left represents a preview of whatever scene you currently have selected. Pressing the transition buttons in between the two videos makes whatever is on the left go live. 

The scenes and transitions can make your videos look very professional. I am all about this idea of making my classes feel like a Twitch live stream. This is the online video language that holds people, particularly young peopleโ€™s, attention. Why not try to imitate it if it makes for more engaging music experiences?

So far some of my scenes include:

  • Webcam: this one projects my face fullscreen

  • Chrome+Me: displays a Chrome window with my webcam feed in the lower corner

  • Desktop+Me: same as above but shows my entire screen instead of a Chrome window

  • AirPlay: using AirServer (directions here), I can stream my iPad screen to a scene

  • iPhone Camera: you can use this app to use your phone as a second camera angle, or just use AirServer and stream your phone with the camera app turned on

  • Agenda: a static image that represents what would usually be on the board when students enter the roomโ€ฆ It's what they will see when they are joining the Google Meet in the opening minutes of class

  • And many slight variations of the above

Scenes and the sources that they contain.

Scenes and the sources that they contain.

David MacDonald (recent podcast guest) has a great scene where he puts an image of a piano keyboard layout on the bottom of the screen, underneath the view of his webcam. The keys light up blue when he plays them so his music theory students can get a clear idea of what he is talking about. I recommend you check out a post of his if you want to learn how to do it. This post is also more instructive about the steps you need to take to get up and running with OBS and is a great starting point if you want go to this path. Read here: Teaching Tech (Live Keyboard Overlay in Zoom) .

live-keyboard-demo-2.gif

OBS makes transitioning between these scenes really quick and engaging to watch. It's fun to combine the different sources so that a student can see my screen, my face talking, and an overhead view of my hands on a keyboard all at once. But even the act of transitioning between those three sources smoothly is a big enhancement alone.

OBS has a super helpful community on Reddit and Discord. I didnโ€™t need them that much though. Googling most of my questions yielded quick results from the OBS user forum.

In Google Meet, Zoom, or Microsoft Teams, you can change the video source from your built in camera to the OBS virtual camera.

In Google Meet, Zoom, or Microsoft Teams, you can change the video source from your built in camera to the OBS virtual camera.

Edit: I have been using OBS and Keyboard Maestro in combination with the Elago Stream Deck and it is a dream! I hope to blog more about this device soon. See below for a demo of what I was able to get it to do in my first sitting.

Zoom Adding Advanced Audio for Professional Musicians

And music teachers everywhere rejoiced! New audio features coming from Zoom soon. Read the linked article below for moreโ€ฆ

Teachers: Top Features for Securing Your Virtual Classrooms & Enhancing Studentsโ€™ Learning Experiences:

Performing arts and music teachers โ€” enjoy crystal-clear, professional-grade sound for your virtual lessons and performances. This option in Advanced Audio will enhance โ€œOriginal Soundโ€ mode, allowing you to disable echo cancellation and post-processing and get rid of compression. Not to get too into the weeds, but this setting will also raise audio codec quality from 22kHz to 48kHz, 96Kbps mono/192Kbps stereo for professional audio transmission in music education and performance applications. 

Note: This mode will require a professional audio interface, microphone, and headphones to allow you to offer high-quality private lessons. You will also be able to stream group performances from the same physical location โ€” with higher-quality audio than most streaming platforms!

Look out for more information as we roll these features out through the end of August and September.

My Online Teaching Setup (High-Tech Edition)

My studio computer and associated hardware.

My studio computer and associated hardware.

When school let out in March, I wrote My Very Straightforward and Very Successful Setup for Teaching Virtual Private Lessons. The impetus for this post, and its snarky title, was an overwhelming number of teachers I saw on Facebook fussing about what apps and hardware they should use to teach online when all you really need is a smartphone, FaceTime, and maybe a tripod.

I stand by that post. But there are also reasons to go high-tech. I have had a lot of time this summer to reflect on the coming fall teaching semester. I have been experimenting with software and hardware solutions that are going to make my classes way more engaging.

Zoom

I have been hesitant about Zoom. I still have reservations about their software. Yet, it is hard to resist how customizable their desktop version is. I will be using Google Meet for my public school classes in September, but for my private lessons, I have been taking advantage of Zoomโ€™s detailed features and settings.

For example, itโ€™s easier to manage audio ins and outs. Right from the chat window, I can change if my voice input is going through my Mac's internal microphone or my studio microphone, or if video is coming from my laptop webcam or my external Logitech webcam. This will also be useful for routing audio from apps into the call (we will get to that in a moment).

Zoom allows you to choose the audio/video input from right within the call.

Zoom allows you to choose the audio/video input from right within the call.

Zoom also allows you to AirPlay the screen of an iOS device to the student as a screen sharing option. This is the main reason I have been experimenting with Zoom. Providing musical feedback is challenging over an internet-connected video call. Speaking slowly helps to convey thoughts accurately, but it helps a lot more when I say โ€œstart at measure 32โ€ and the student sees me circle the spot I want them to start in the music, right on their phone.

You can get really detailed by zooming in and out of scores and annotating as little as a single note. If you are wondering, I am doing all of this on a 12.9 inch iPad Pro with Apple Pencil, using the forScore app. A tight feedback loop of โ€œstudent performanceโ€”>teacher feedbackโ€”>student adjustmentโ€ is so important to good teaching, and a lot of it is lost during online lessons. It helps to get some of it back through the clarity and engagement of annotated sheet music.

Selecting AirPlay as a screen sharing option.

Selecting AirPlay as a screen sharing option.

AirPlaying annotated sheet music to the Zoom call using the iPad Pro and forScore app.

AirPlaying annotated sheet music to the Zoom call using the iPad Pro and forScore app.

As much as I love this, I still think Zoom is pretty student hostile, particularly with the audio settings. Computers already try to normalize audio by taking extreme louds and compressing them. Given that my private lessons are on percussion instruments, this is very bad. Zoom is the worst at it of all the video apps I have used. To make it better, you have to turn on an option in the audio settings called โ€œUse Original Audioโ€ so that the host hears the studentโ€™s raw sound, not Zoomโ€™s attempt to even it out. Some of my students report that they have to re-choose this option in the โ€œMeeting Settingsโ€ of each new Zoom call.

If this experiment turns out to be worth it for the sheet music streaming, I will deal with it. But this is one of the reasons why I have been using simple apps like FaceTime up until this point.

My Zoom audio settings.

My Zoom audio settings.

My Zoom advanced audio settings.

My Zoom advanced audio settings.

Sending App Audio Directly to the Call

I have been experimenting with a few apps by Rogue Amoeba that give me more control over how audio is flowing throughout my hardware and software.

Last Spring, I would often play my public school students YouTube videos, concert band recordings from Apple Music, and warm-up play-alongs that were embedded in Keynote slides. I was achieving this by having the sound of these sources come out of my computer speakers and right back into the microphone of my laptop. It actually works. But not for everyone. And not well.

Loopback is an app by Rogue Amoeba that allows you to combine the audio input and output of your various microphones, speakers, and apps, into new single audio devices that can be recognized by the system. I wrote about it here. My current set up includes a new audio device I created with Loopback which combines my audio interface and a bunch of frequently used audio apps into one. The resulting device is called Interface+Apps. If I select it as the input in my computerโ€™s sound settings, then my students hear those apps and any microphone plugged into my audio interface directly. The audio quality of my apps is therefore more pure and direct, and there is no risk of getting an echo or feedback effect from my microphone picking up my computer speakerโ€™s sound.

A Loopback device I created which combines the audio output of many apps with my audio interface into a new, compound device called โ€œInterface+Apps.โ€

A Loopback device I created which combines the audio output of many apps with my audio interface into a new, compound device called โ€œInterface+Apps.โ€

I can select this compound device from my Macโ€™s Sound settings.

I can select this compound device from my Macโ€™s Sound settings.

Now I can do the following with a much higher level of quality...

  • Run a play-along band track and have a private student drum along
  • Play examples of professional bands for my band class on YouTube
  • Run Keynote slides that contain beats, tuning drones, and other play-along/reference tracks
  • and...

Logic Pro X

Logic Pro X is one of my apps routing through to the call via Loopback. I have a MIDI keyboard plugged into my audio interface and a Roland Octopad electronic drum pad that is plugged in as an audio source (though it can be used as a MIDI source too).

The sounds on the Roland Octopad are pretty authentic. I have hi-hat and bass drum foot pedal triggers so I can play it naturally. So in Logic, I start with an audio track that is monitoring the Octopad, and a software instrument track that is set to a piano (or marimba or xylophone, whatever is relevant). This way, I can model drum set or mallet parts for students quickly without leaving my desk. The audio I produce in Logic is routed through Loopback directly into the call. My students say the drum set, in particular, sounds way better in some instances than the quality of real instruments over internet-connected calls. Isnโ€™t that something...

Multiple Camera Angles

Obviously, there is a reason I have previously recommended a set up as simple as a smartphone and a tripod stand. Smartphones are very portable and convenient. And simple smartphone apps like FaceTime and Google Duo make a lot of good default choices about how to handle audio without the fiddly settings some of the more established โ€œvoice conferenceโ€ platforms are known for.

Furthermore, I canโ€™t pick up my desk and move it to my timpani or marimba if I need to model something. So I have begun experimenting with multiple camera angles. I bought a webcam back in March (it finally just shipped). I can use this as a secondary camera to my laptopโ€™s camera (Command+Shift+N in Zoom to change cameras).

Alternatively, I can share my iPhone screen via AirPlay and turn on the camera app. Now I can get up from my desk and go wherever I need to. The student sees me wherever I go. This option is sometimes laggy.

Alternatively, I can log in to the call separately on the iPhone and Mac. This way, there are two instances of me, and if I need to, I can mute the studio desk microphone, and use the phone microphone so that students can hear me wherever I go. I like this option the best because it has the added benefit of showing me what meeting participants see in Zoom.

Logging in to the Zoom call on the Mac and iPhone gives me two different camera angles.

Logging in to the Zoom call on the Mac and iPhone gives me two different camera angles.

SoundSource

This process works well once it is set up. But it does take some fiddling around with audio ins and outs to get it right. SoundSource is another app by Rogue Amoeba that takes some of the fiddly-ness out of the equation. It replaces the sound options in your Macโ€™s menubar, offering your more control and more ease at the same time.

This app is seriously great.

This app is seriously great.

This app saved me from digging into the audio settings of my computer numerous times. In addition to putting audio device selection at a more surface level, it also lets you control the individual volume level of each app, apply audio effects to your apps, and more. One thing I do with it regularly is turn down the volume of just the Zoom app when my students play xylophone.

Rogue Amoeba's apps will cost you, but they are worth it for those who want more audio control on the Mac. Make sure you take advantage of their educator discount.

EDIT: My teaching set up now includes the use of OBS and an Elago Stream Deck. Read more here.

Conclusion

I went a little overboard here. If this is overwhelming to you, don't get the idea that you need to do it all. Anyone of these tweaks will advance your setup and teaching.

This post is not specific about the hardware I use. If you care about the brands and models of my gear, check out My Favorite Technology to read more about the specific audio equipment in my setup.

Panel Discussion: "Teaching Music Online During the Pandemic" this Wednesday, August 5, 2020

I am taking part in a Panel Discussion called "Teaching Music Online During the Pandemic" this Wednesday, August 5th. It is taking place on the Music Teachers Facebook Group at 8 pm through Zoom.

I will specifically be contributing ideas about practical instruction for performing ensembles. I am planning to discuss everything from large group rehearsal to break-out chamber ensembles, to music scanning apps, and software for assessing student performance.

Some great minds are involved. Here is a description of the panel from the Facebook Event:

Join us for a free online panel discussion with several of your Music Teacher Administrators and Moderators and special guests as we discuss the tools, techniques, and resources to move your music ensembles and music classrooms totally online or to a blended learning hybrid. Panelists include Jim Frankel, CEO of Music First; Katie Wardrobe, Director, Midnight Music Technology Training; Ron Kearns, retired HS band teacher; Tom West Blended Learning Instrumental Music teacher; Robby Burns, MS band teacher; Richard McCready, HS guitar teacher & music ministry; Tiffany Walker, MS band teacher; Krystal Williams, HS band teacher.

If you are interested, you can join the group here. Note: You will not be admitted into the group if you do not answer the questions.

CleanShot 2020-08-03 at 11.05.59@2x.png

Routing Audio from Your Apps Directly Into Your Zoom Call (Or Other Voice Chat App) with Loopback

UPDATE: Learn more about Loopback from my interview with CEO Paul Kafasis on my podcast. Listen and subscribe belowโ€ฆ

Loopback is an app that creates custom audio ins and outs for the Mac using the audio of other apps.

Loopback is an app that creates custom audio ins and outs for the Mac using the audio of other apps.

Have you been teaching a class in Google Meet or Zoom and wanted to play a song from iTunes for your digital classroom? Or perhaps a YouTube video or any other application with audio?

Sure, you can play it right on your computer and let the audio from your speakers go straight back into the microphone input of your computer. This works ok in my opinion. But it isn't going to produce a pure representation of the audio I am trying to send. And in some cases, it creates issues with echo, delay, or a nasty feedback loop.

So what do you do? Rogue Amoeba makes excellent Mac apps that, for lack of better explanation, hack into the audio system of your Mac. I have written about Audio Hijack here before, their app that allows you to record audio from other applications (and that's just the start of all the powerful things it can do). Rogue Amoeba also makes an excellent utility called Loopback.

What does Loopback do? Think about your computer's audio settings. You have an Input and an Output. The Input is, by default, your computer microphone, and the Output is the speakers. If you connect an audio interface that has higher quality microphone and speakers plugged in, you would need to set the Input and Output to that interface to get the input and out put the be the microphone and speakers, respectively.

Usually my computer microphone is a Device that can be set to the computerโ€™s Input. In the scenario above, Loopback has allowed me to combine the audio from my microphone and the Music app into a new audio Device called โ€œMusic+Micโ€ that can be selecโ€ฆ

Usually my computer microphone is a Device that can be set to the computerโ€™s Input. In the scenario above, Loopback has allowed me to combine the audio from my microphone and the Music app into a new audio Device called โ€œMusic+Micโ€ that can be selected as the input of my Mac or any individual app.

Your Inputs and Outputs can be controlled from the Sound settings of your computer. Some audio apps also let you control how, specifically, they behave. For example, I have manually set up GarageBand and Skype to use my audio interface as the Device I use for input so that whether I am recording for my podcast, or simply catching up with a relative, they hear me through the microphone, no matter what Device my Macโ€™s audio Output is set to in the System Preferences.

Loopback allows you to create Inputs and Outputs that are accessible to your Mac's Sound settings as well as your apps. In the example above, I have created an Input that combines my Mac's microphone (the usual Input) with the output of the Apple Music app, something I might want to use to play a recording example for my students in a Google Meet.

Selecting my new audio Device from the System Preferences.

Selecting my new audio Device from the System Preferences.

Look now as I go to my computer's Sound settings, and I can select this new custom Input to be used across the entire operating system! This way, when I am in a Google Meet, students are hearing both me speaking through the mic and all of the output of the Music app.

Now I can route my band warm up tracks, reference recordings, or any other audio I desire, into my Google Meet classrooms.

Now I can route my band warm up tracks, reference recordings, or any other audio I desire, into my Google Meet classrooms.